signapk位置 :./build/tools/signapk
编译:make signapk
一般签名过程:java -jar signapk.jar cert.x509.pem private.pk8 demo.apk new_demo.apk
以下为获取公钥与加密算法文件pem的过程:
1 |
|
读取证书链:
SignApk.main -> SingApk.readPublicKey -> CertificateFactory.generateCertificate -> X509Factory.engineGenerateCertificate
engineGenerateCertificate用于从文件流中读取的数据中生成一个X.509证书对象1
2
3
4
5
6
7
8
9
10
11
12
13
14
15
16
17
18
19
20
21
22
23
24
25
26
27
28
29
30
31
32
33
34public Certificate engineGenerateCertificate(InputStream is)
throws CertificateException
{
if (is == null) {
// clear the caches (for debugging)
certCache.clear();
X509CertificatePair.clearCache();
throw new CertificateException("Missing input stream");
}
try {
//从文件流中读取ASN.1编码的内容,它可能是一个BER或者PEM格式内容的东西 ,且是经过base64编码的,这东西就是我们在pem里看到的诸如
//-----BEGIN PRIVATE KEY-----
//-----END PRIVATE KEY-----
//它中间的内容是经过base64的,关于ASN可以链接[这里](http://blog.csdn.net/sever2012/article/details/7698297)
byte[] encoding = readOneBlock(is);
if (encoding != null) {
//这里使用一个证书的二进制数据,从cache对象(memoryCache)中获取到对应的证书对象(假如已经存在在缓存中)
//先使用encoding为参数构造一个Cache.EqualByteArray对象,然后再将其丢进一个hashMap中,在丢进去的时候会调用到EqualByteArray对象重载的hashcode方法,从而针对encoding生成一个唯一的hashcode,以此来确定及加速证书的查找
X509CertImpl cert = (X509CertImpl)getFromCache(certCache, encoding);
if (cert != null) {
return cert;
}
//假如缓存中找不到证书,则新建一个并放入缓存
cert = new X509CertImpl(encoding);
addToCache(certCache, cert.getEncodedInternal(), cert);
return cert;
} else {
throw new IOException("Empty input");
}
} catch (IOException ioe) {
throw (CertificateException)new CertificateException
("Could not parse certificate: " + ioe.toString()).initCause(ioe);
}
}
读取pk81
2
3
4
5
6
7
8
9
10
11
12
13
14
15
16
17
18
19
20
21
22
23
24
25
26
27
28
29/** Read a PKCS#8 format private key. */
private static PrivateKey readPrivateKey(File file) throws IOException, GeneralSecurityException {
DataInputStream input = new DataInputStream(new FileInputStream(file));
try {
//将pk8文件读入内存
byte[] bytes = new byte[(int) file.length()];
input.read(bytes);
/* Check to see if this is in an EncryptedPrivateKeyInfo structure. */
//判断pk8文件是否一个被加密的文件,如果是,则需要输入密钥(from console),加密方式同样在pk8文件中,假如没有加密,则直接创建spec即可
PKCS8EncodedKeySpec spec = decryptPrivateKey(bytes, file);
if (spec == null) {
spec = new PKCS8EncodedKeySpec(bytes);
}
/*
* Now it's in a PKCS#8 PrivateKeyInfo structure. Read its Algorithm
* OID and use that to construct a KeyFactory.
*/
ASN1InputStream bIn = new ASN1InputStream(new ByteArrayInputStream(spec.getEncoded()));
PrivateKeyInfo pki = PrivateKeyInfo.getInstance(bIn.readObject());
String algOid = pki.getPrivateKeyAlgorithm().getAlgorithm().getId();//加密算法OID
//从KeyFactory中获取到加密算法,然后通过PrivateKeyInfo生成PrivateKey,里面会根据oid去查找系统是否存在合适的加密算法实现(spi:Service Provider Interface,服务提供接口)
return KeyFactory.getInstance(algOid).generatePrivate(spec);
} finally {
input.close();
}
}
完成公私钥的解释后,就可以对apk包进行签名了。SignApk支持整包签名或单个文件签名,此处只查看单个APK签名的。
1 | Manifest manifest = addDigestsToManifest(inputJar, hashes); |
整包签名的过程定义在addDigestsToManifest的方法中,从名字可以看出,这个方法是用来生成 MANIFEST对象的,最后能得到如。1
2
3
4
5
6
7
8Manifest-Version: 1.0
Created-By: 1.0 (Android SignApk)
Name: res/drawable-mdpi-v4/ic_action_search.png
SHA-256-Digest: r/p7eAl6u2xQmjBmETThpIw0neu/LFw682iIIOPEYSQ=
Name: assets/xm_splash_images/0.png
SHA-256-Digest: BGflilL4r40HG3K8pqSumGgLRR4qDTm4H67kbzaitZs=
的结构,只不过Manifest对象存的是<文件路径,Attributes>结构,Attributes是一个包含多种属性值的集合,一般为jar/apk内的每个文件的sha1与sha256的哈希值的Base64值。也就是说到时候生成出来的MANIFEST.MF里存放的就是每个文件的SHA1或SHA256的值的Base64,即MANIFEST.MF:1
2Name: [FilePath]
SHA-256-Digest: Base64(SHA256(FilePath))
至于是选择SHA1还是SHA256,则视证书的密钥长度而定(即cert)。
copyFiles就是一个单纯的文件复制,但会修改文件的时间戳。
signFile就是正式对文件进行签名了,将会使用到所有的公私钥。1
2
3
4
5
6
7
8
9
10
11
12
13
14
15
16
17
18
19
20
21
22
23
24
25
26
27
28
29
30private static void signFile(Manifest manifest, JarFile inputJar, X509Certificate[] publicKey, PrivateKey[] privateKey, JarOutputStream outputJar) throws Exception {
// Assume the certificate is valid for at least an hour.
long timestamp = publicKey[0].getNotBefore().getTime() + 3600L * 1000;
// MANIFEST.MF
JarEntry je = new JarEntry(JarFile.MANIFEST_NAME);
je.setTime(timestamp);
outputJar.putNextEntry(je);
//将manifest的内容写到outputjar中,保存到META-INF/MANIFEST.MF中
manifest.write(outputJar);
int numKeys = publicKey.length;
for (int k = 0; k < numKeys; ++k) {
// 生成CERT.SF / CERT#.SF,numKeys表示证书的个数
je = new JarEntry(numKeys == 1 ? CERT_SF_NAME : (String.format(CERT_SF_MULTI_NAME, k)));
je.setTime(timestamp);
outputJar.putNextEntry(je);
ByteArrayOutputStream baos = new ByteArrayOutputStream();
writeSignatureFile(manifest, baos, getDigestAlgorithm(publicKey[k]));
byte[] signedData = baos.toByteArray();
outputJar.write(signedData);
// 重成CERT.{EC,RSA} / CERT#.{EC,RSA}
final String keyType = publicKey[k].getPublicKey().getAlgorithm();
je = new JarEntry(numKeys == 1 ? (String.format(CERT_SIG_NAME, keyType)) : (String.format(CERT_SIG_MULTI_NAME, k, keyType)));
je.setTime(timestamp);
outputJar.putNextEntry(je);
writeSignatureBlock(new CMSProcessableByteArray(signedData), publicKey[k], privateKey[k], outputJar);
}
}
这个过程将会生成 META-INF中的三个文件,分别为META-INF/MANIFEST.MF,META-INF/CERT.MF,META-INF/CERT.RSA,分别对这三个过程进行分析。
第一部分是将之前生成的Manifest对象写到jar/apk中,这个没啥好说的,写的啥上面有说。
第二部分就是生成CERT.SF。CERT.SF的格式与MANIFEST.MF的格式类似,代码及注释见下:1
2
3
4
5
6
7
8
9
10
11
12
13
14
15
16
17
18
19
20
21
22
23
24
25
26
27
28
29
30
31
32
33
34
35
36
37
38
39
40
41
42
43
44
45
46
47
48
49
50
51private static void writeSignatureFile(Manifest manifest, OutputStream out, int hash) throws IOException, GeneralSecurityException {
Manifest sf = new Manifest();
Attributes main = sf.getMainAttributes();
main.putValue("Signature-Version", "1.0");
main.putValue("Created-By", "1.0 (Android SignApk)");
MessageDigest md = MessageDigest.getInstance(hash == USE_SHA256 ? "SHA256" : "SHA1");
ByteArrayOutputStream output = new ByteArrayOutputStream();
PrintStream print = new PrintStream(new DigestOutputStream(output, md), true, "UTF-8");
//对整个MANIFEST.MF计算哈希值,将整个manifest写入到output中
manifest.write(print);
print.flush();
main.putValue(hash == USE_SHA256 ? "SHA-256-Digest-Manifest" : "SHA1-Digest-Manifest", new String(Base64.encode(md.digest()), "ASCII"));
//遍历所有META-INF/MANIFESST.MF中的记录
Map<String, Attributes> entries = manifest.getEntries();
for (Map.Entry<String, Attributes> entry : entries.entrySet()) {
// Digest of the manifest stanza for this entry.
print.print("Name: " + entry.getKey() + "\r\n");
for (Map.Entry<Object, Object> att : entry.getValue().entrySet()) {
String value = att.getKey() + ": " + att.getValue() + "\r\n";
System.out.println(value);
print.print(value);
}
print.print("\r\n");
print.flush();
Attributes sfAttr = new Attributes();
//print在print的时候会调用DigestOutputStream的write方法(PrintStream同样是FilterOutputStream的子类)
//所以在print的时候会调用md的update,所以当次的哈希对象就是从上一次flush到当次flush间print的数据
//也即类似:
/*
* Name: res/drawable-mdpi-v4/ic_action_search.png
* SHA-256-Digest: r/p7eAl6u2xQmjBmETThpIw0neu/LFw682iIIOPEYSQ=
*/
sfAttr.putValue(hash == USE_SHA256 ? "SHA-256-Digest" : "SHA1-Digest-Manifest", new String(Base64.encode(md.digest()), "ASCII"));
//然后同样按Manifest的存储方式放置
sf.getEntries().put(entry.getKey(), sfAttr);
}
//最后写出文件即可
CountOutputStream cout = new CountOutputStream(out);
sf.write(cout);
if ((cout.size() % 1024) == 0) {
cout.write('\r');
cout.write('\n');
}
}
从代码可以看出,CERT.SF中,结构与MANIFEST.MF类似,但对应的哈希值不一样,MANIFEST.MF中的哈希是对每个文件的哈希,而CERT.SF是对MANIFEST.MF中对应的一个块进行哈希,如MANIFEST.MF中的一个块,设A等于以下内容1
2Name: res/drawable-mdpi-v4/ic_action_search.png
SHA-256-Digest: r/p7eAl6u2xQmjBmETThpIw0neu/LFw682iIIOPEYSQ=
则对应CERT.SF中的内容为1
2Name: res/drawable-mdpi-v4/ic_action_search.png
SHA-256-Digest: 8PGxTAeH3xeQA5zrAuMp7HqY8Ag0aLwNf+/X6udGdRI=
即hash值为 base64(SHA256(A))
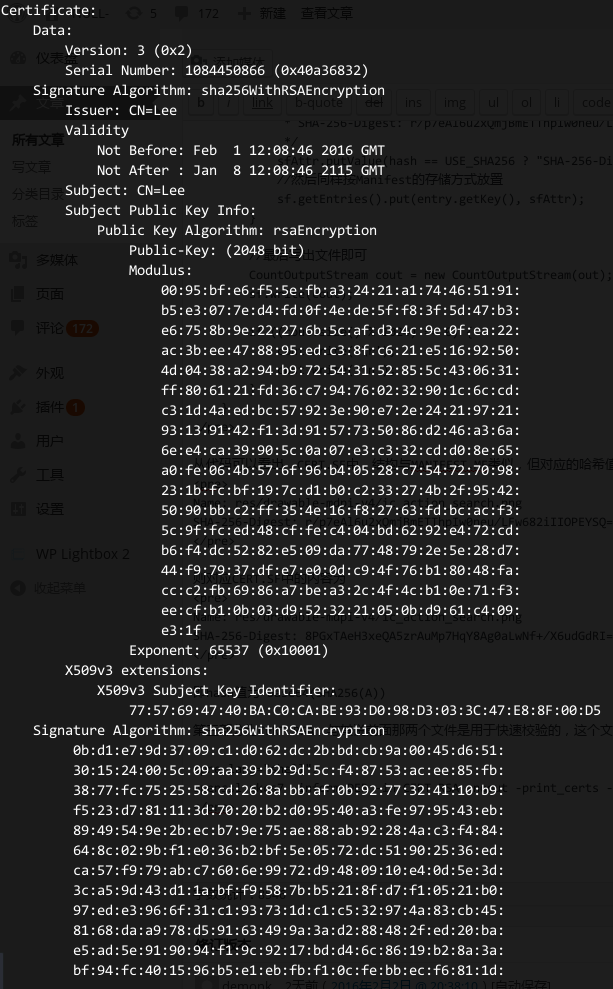
第三部分为CERT.RSA,与其说前面那两个文件是用于快速校验的,这个文件就是为了保护签名的不可修改替换的。CERT.RSA是二进制文件,其中保存了公钥、所采用的加密算法等信息,我们可以使用以下命令来查看文件内容
1 | openssl pkcs7 -inform DER -in CERT.RSA -noout -print_certs -text |
生成CERT.RSA主要的方法在writeSignatureBlock里1
2
3
4
5
6
7
8
9
10
11
12
13
14
15
16
17
18
19
20
21
22
23
24private static void writeSignatureBlock(CMSTypedData data, X509Certificate publicKey, PrivateKey privateKey, OutputStream out) throws IOException, CertificateEncodingException,
OperatorCreationException, CMSException {
ArrayList<X509Certificate> certList = new ArrayList<X509Certificate>(1);
certList.add(publicKey);
//用于存储将要用到的证书的库
JcaCertStore certs = new JcaCertStore(certList);
CMSSignedDataGenerator gen = new CMSSignedDataGenerator();
ContentSigner signer = new JcaContentSignerBuilder(getSignatureAlgorithm(publicKey)).setProvider(sBouncyCastleProvider).build(privateKey);
gen.addSignerInfoGenerator(new JcaSignerInfoGeneratorBuilder(new JcaDigestCalculatorProviderBuilder().setProvider(sBouncyCastleProvider).build()).setDirectSignature(true).build(signer,
publicKey));
gen.addCertificates(certs);
/**
* generate a signed object that for a CMS Signed Data object using the given provider - if encapsulate is true a copy of the message will be included in the signature with the default content
* type "data".
*/
CMSSignedData sigData = gen.generate(data, false);
ASN1InputStream asn1 = new ASN1InputStream(sigData.getEncoded());
//使用DER(ASN.1)格式写出
DEROutputStream dos = new DEROutputStream(out);
dos.writeObject(asn1.readObject());
}
其中,CMSTypedData就是以第二步中生成的CERT.SF文件为数据源封装的对象,使用证书中定义的加密方法,再使用私钥对数据进行加密(签名),然后再将签名数据与公钥信息一同写到CERT.RSA中即完成整次签名过程。
其实整个流程是一个连续的递进过程,MANIFEST.MF记录文件的摘要信息,CERT.SF记录MANIFEST.MF的记录摘要信息,CERT.RSA记录CERT.SF的加密信息,前边两个其实都是可以手动修改成合法模式的,但唯独第三个,因为加密的存在,只有私钥能加密出签名,所以即便修改前边两个文件,也是无补于是的。在安装APK的时候验证这些信息,就达到了保护文件的目的了。

